

To set up self-hosted checkout with Stripe, you run a small server endpoint that creates a Stripe Checkout Session with your own API keys, send the buyer to it, and fulfill the order from a signed webhook. The distinction that matters is that your server never touches card numbers. Stripe's page or iframe does. "Self-hosted" means you own the logic, the keys, and the customer relationship, not the card data.
TL;DR:
- Choose your checkout type first: Stripe-hosted page, embedded Checkout, or fully custom Payment Element. Embedded is the best default for most small sellers.
- The core build is three pieces: a server route that creates a Checkout Session, a success page, and a webhook endpoint that verifies Stripe's signature.
- Never fulfill an order from the success redirect. Fulfill only from the signed
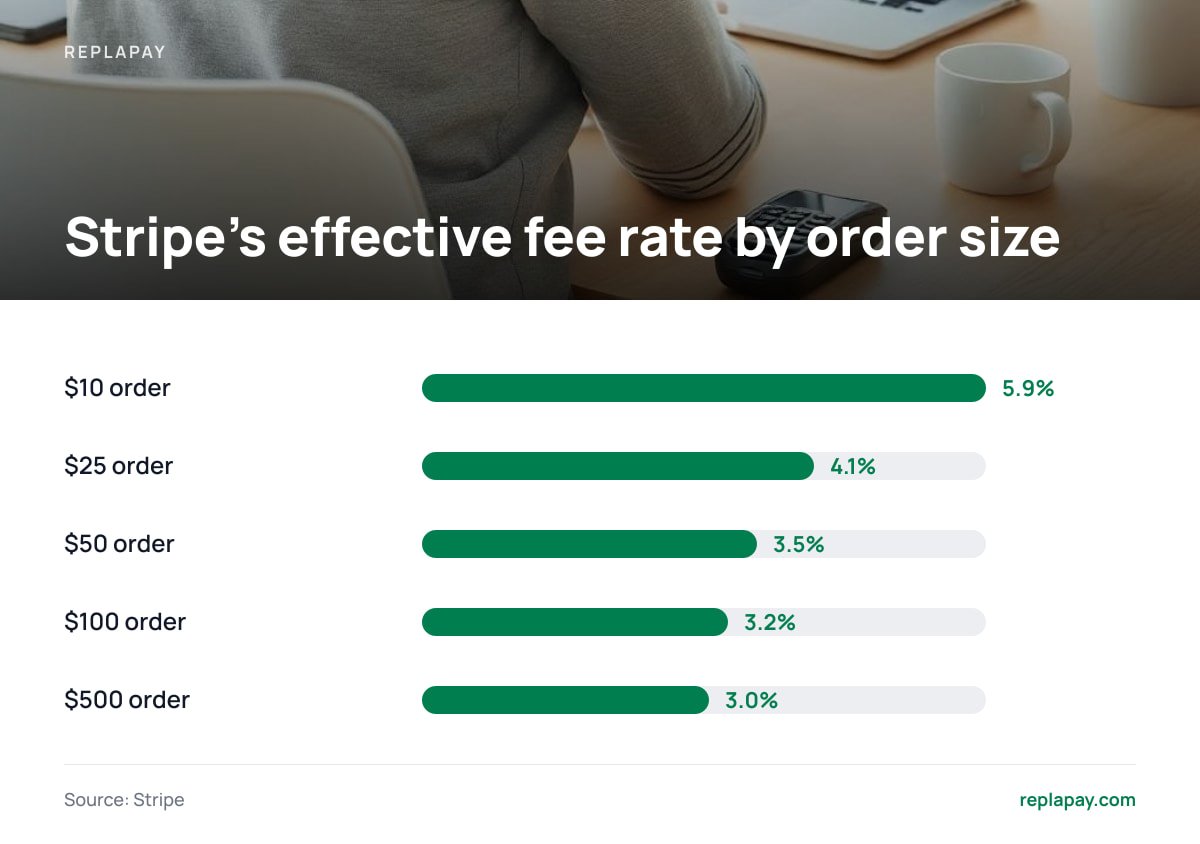
checkout.session.completedwebhook, and make it idempotent.- Stripe's standard US pricing of 2.9% + 30 cents means a $10 sale costs 5.9% in fees while a $100 sale costs 3.2%, so your price points matter.
- You can skip code entirely with Payment Links, but you give up cart logic, custom fulfillment, and crypto support.
Table of Contents
- Hosted, Embedded, or Custom: Pick the Checkout Type Before You Write Code
- What You Need Before the First API Call
- How to Set Up Self-Hosted Checkout With Stripe in Six Steps
- Webhooks: Why the Success Page Can't Be Trusted
- Test Cards and Test Mode: What to Run Before Going Live
- Express Checkout, Apple Pay, and the Domain Step People Skip
- Doing It Without Code: Payment Links and When They're Enough
- What Self-Hosting Costs: Stripe's Fee Curve and Your Own Time
- Skip the Build: Get Self-Hosted Stripe Checkout Without Writing the Webhook Layer
- Frequently Asked Questions
- Sources
Hosted, Embedded, or Custom: Pick the Checkout Type Before You Write Code
Most tutorials start with an API call. Start with the decision instead, because it changes how much code you write and how much compliance work you inherit. Stripe's Checkout documentation describes the main paths, and they differ more than the marketing suggests.
| Option | Where the payment form lives | Code you write | Card-data exposure | Best for |
|---|---|---|---|---|
| Stripe-hosted Checkout | A Stripe page you redirect to | A server route and a webhook | None | Fastest launch, lowest risk |
| Embedded Checkout | An iframe on your page | The same, plus a small client script | None | Keeping buyers on your domain |
| Payment Element (custom) | Stripe-built fields inside your own layout | Server and client code, PaymentIntents, more edge cases | None if you use Elements | Heavy design control |
| Payment Links | A Stripe page, no code | None | None | One-off products, no developer |
Our pick: embedded Checkout for most small sellers. You get your own domain in the address bar, Stripe still handles card validation, 3D Secure, and wallets, and you skip the long tail of edge cases that the fully custom Payment Element makes you handle yourself. Choose the Stripe-hosted page only if you want the smallest possible build. Choose the custom route only if a designer is blocking you.
On compliance, the PCI Security Standards Council publishes SAQ A, the shortest self-assessment questionnaire, for card-not-present merchants who fully outsource card data handling. All three Stripe-built options are designed to keep you in that bucket. A form where your own server receives raw card numbers is not.
What You Need Before the First API Call

You need four things in place. Skipping one is how people lose an afternoon.
- A Stripe account with business details complete. Test mode works immediately, but live charges need verified details and a connected bank account.
- Two API key pairs. Each mode has a publishable key (safe in the browser) and a secret key (server only, never in a repo or front-end bundle). Store the secret key in an environment variable.
- Products and Prices. Create them in the Dashboard or via the API. A Price ID like
price_123is what your server passes to Checkout. - HTTPS on a domain you control. Webhooks, wallet payments, and redirect URLs all assume it. Local development is the only exception.
Pro Tip: Create a restricted API key for your server instead of using the full secret key. Give it write access to Checkout Sessions and read access to the few objects you need. If your hosting environment leaks, a restricted key cannot issue refunds or touch payouts.
How to Set Up Self-Hosted Checkout With Stripe in Six Steps
This is the shortest working path using Node. The pattern is identical in Python, PHP, Ruby, and Go because it is all the same REST API.
Steps 1-3: Install, create the session, redirect
- Install the library. Run
npm install stripeand load your secret key from the environment. - Create a server route that makes a Checkout Session. Use
mode: "payment"for one-time sales. - Redirect the buyer. Send a 303 redirect to the session URL, or hand the client secret to the embedded form.
import Stripe from "stripe";
const stripe = new Stripe(process.env.STRIPE_SECRET_KEY);

app.post("/create-checkout-session", async (req, res) => {
  const session = await stripe.checkout.sessions.create({
    mode: "payment",
    line_items: [{ price: "price_123", quantity: 1 }],
    success_url: "https://yourdomain.com/thanks?session_id={CHECKOUT_SESSION_ID}",
    cancel_url: "https://yourdomain.com/pricing",
  });
  res.redirect(303, session.url);
});
For the embedded version, set the session's UI mode to embedded (confirm the current value in the docs for your API version), swap success_url for return_url, and mount the form with Stripe.js using the session's client secret.
Steps 4-6: Webhook, test, go live
- Add a webhook endpoint (covered in the next section).
- Run the test-card matrix (two sections down).
- Swap in live keys and a live webhook secret. Test and live modes have separate keys, separate webhook endpoints, and separate signing secrets. Mixing them is the most common launch-day failure.
Stripe also maintains sample repositories on GitHub, including one for one-time Checkout payments. They are a useful reference for your language, but read them as examples, not production code. They rarely include idempotent fulfillment.
Webhooks: Why the Success Page Can't Be Trusted
A buyer can close the tab before the redirect, hit the success URL by hand, or lose connection after paying. The redirect proves only that a browser loaded a page.
A
success_urlredirect proves a browser loaded a page. Only a signature-verifiedcheckout.session.completedwebhook proves money moved.
Stripe's webhook documentation tells you to verify every event using the Stripe-Signature header and your endpoint's signing secret. Use the library's constructEvent helper and pass it the raw request body. If your framework parses JSON before you see it, signature verification will fail.
app.post("/webhook", express.raw({ type: "application/json" }), (req, res) => {
  const event = stripe.webhooks.constructEvent(
    req.body,
    req.headers["stripe-signature"],
    process.env.STRIPE_WEBHOOK_SECRET
  );
  if (event.type === "checkout.session.completed") {
    // check session.payment_status === "paid", then fulfill once
  }
  res.sendStatus(200);
});
Three rules keep this safe:
- Check
payment_status. For delayed payment methods, a completed session can still be unpaid. Wait forcheckout.session.async_payment_succeededbefore delivering. - Make fulfillment idempotent. Stripe retries failed deliveries, so the same event can arrive twice. Store the session ID with a unique constraint and skip duplicates.
- Return 200 fast. Do slow work, such as sending email or generating license keys, after you acknowledge, or Stripe will treat the delivery as failed.
Pro Tip: Pass your own order or user ID in metadata or client_reference_id when you create the session. Matching a payment to a buyer by email address breaks the first time someone pays with a different address than the one on their account.
Test Cards and Test Mode: What to Run Before Going Live
Stripe's testing documentation lists test card numbers that behave predictably in test mode. Use any future expiry date and any three-digit CVC. Run at least these three before you flip to live keys:
- Success:
4242 4242 4242 4242. Confirms the happy path and your webhook fulfillment. - Generic decline:
4000 0000 0000 0002. Confirms your cancel and retry experience is not a dead end. - 3D Secure required:
4000 0025 0000 3155. Confirms authentication flows work, which matters for buyers in regions where it is common.
Then test the failures that cards cannot simulate. Send the same webhook twice and confirm you fulfill once. Stop your server, complete a payment, restart, and confirm Stripe's retry delivers the order. Use the Stripe CLI's stripe listen command to forward events to localhost while you build.
Express Checkout, Apple Pay, and the Domain Step People Skip
Wallet buttons lift conversion on mobile because they skip typing. On Stripe-hosted Checkout, eligible wallets appear automatically. On a self-hosted page using Stripe's Express Checkout Element, you must register and verify your domain for Apple Pay. If the buttons do not show, an unverified domain is the likeliest cause, followed by testing in a browser with no wallet card saved.
Expect the buttons to vanish on localhost and staging subdomains you never registered. That is normal behavior, not a bug.
Doing It Without Code: Payment Links and When They're Enough
If you sell one or two products and fulfill by hand, Payment Links are the honest answer. You create the link in the Dashboard, paste it into a button or message, and you are live in minutes. Our write-up on self-hosted payment links software covers what changes when you own the link layer, and our guide to selling through an Instagram payment link shows a practical no-code use case.
Payment Links stop working for you when you need any of these: automatic license delivery, per-user pricing, upsells, or a crypto option. Those need your own endpoint, which is the build above.
What Self-Hosting Costs: Stripe's Fee Curve and Your Own Time
Building your own checkout does not lower Stripe's fees. It removes the second layer on top. Stripe's pricing page lists 2.9% + 30 cents for standard US online card payments, with extra charges for international cards and currency conversion. Check it for your country, because rates vary.
| Order size | Stripe fee (2.9% + $0.30) | Effective rate |
|---|---|---|
| $10 | $0.59 | 5.9% |
| $25 | $1.03 | 4.1% |
| $50 | $1.75 | 3.5% |
| $100 | $3.20 | 3.2% |
| $500 | $14.80 | 3.0% |
At $10 per sale, Stripe's flat 30-cent fee makes your effective rate 5.9%. At $100, it falls to 3.2%.
That curve is why a $9 product feels different from a $99 one. Bundle small items or raise your minimum if your average order is under $20. For the full breakdown of costs beyond the headline rate, see hidden Stripe fees for small businesses.
The trade-off is your time. Expect a day or two for a clean first build and ongoing maintenance whenever Stripe changes an API version. If you sell $50,000 a year, the gap between roughly 3.5% in Stripe fees and a 10% marketplace take is about $3,250. Whether that justifies a few days of work is a straightforward calculation. We run through it in owning your checkout instead of renting it.
Skip the Build: Get Self-Hosted Stripe Checkout Without Writing the Webhook Layer
Everything above is doable, and we would rather you understand it than trust a black box. But most sellers do not want to maintain signature verification, idempotency tables, and wallet domain registration. ReplaPay is a self-hosted checkout license that runs on your server, connects directly to your own Stripe account, and also accepts Bitcoin, Lightning, and stablecoins into your own wallet. It includes payment links and a Stripe fee calculator. It costs $299 once, with 12 months of updates and 30 days of setup support.
There is one limit worth stating. You still run and host it, so you are responsible for your server, your keys, and your uptime. If you have no appetite for that, a marketplace is the right trade. If you sell enough that a 5-13% cut stings, the license pays for itself quickly. Check the spec sheet against your stack before you buy.
Frequently Asked Questions
Is Stripe Checkout self-hosted?
No. Stripe Checkout itself is hosted by Stripe, either as a Stripe page or an embedded iframe. What you host is the server code that creates sessions and receives webhooks. That is why card numbers never touch your infrastructure.
Do I need a backend to use Stripe Checkout?
For custom carts and automatic fulfillment, yes, because the secret key must stay on a server. Without one, you can use Payment Links, which need no code but support fewer workflows.
What is the difference between hosted and embedded Stripe Checkout?
Hosted Checkout redirects buyers to a Stripe page. Embedded Checkout renders the same form inside your own page, so buyers stay on your domain. Both keep card data off your server, and embedded takes slightly more client code.
Which Stripe test card should I use first?
Use 4242 4242 4242 4242 with any future expiry and any CVC to confirm the success path. Then test 4000 0000 0000 0002 for a decline and 4000 0025 0000 3155 for 3D Secure before going live.
Why is my webhook signature verification failing?
Most often the framework parsed the request body into JSON before verification, so the raw bytes no longer match the signature. The second most common cause is using a test-mode signing secret with live events, or the reverse.
Sources
- Accept a payment with Stripe Checkout | Stripe Documentation
- Receive Stripe events in your webhook endpoint | Stripe Documentation
- Testing Stripe | Stripe Documentation
- Express Checkout Element | Stripe Documentation
- Stripe Pricing | Stripe
- PCI Security Standards Council | PCI SSC